Tuesday, December 8, 2009

Felted crochet

I have a nasty habit of starting multiple projects at a time. As of current, I'm working on a christmas present for a friend, a vest for my husband, and a blanket for my youngest daughter.

A friend of mine got me interested in felted crochet, which I told myself that I would never do. Until I saw this:

(the BAG)

I have a huge obsession with bags. And this bag, to me, is absolutely gorgeous, and I love the colouring, the simple granny square design, yet it didn't seem tacky at all. In my mind, I envisioned a similar bag but with purple and pink colouring, and most likely a different style of bag. I also brainstormed on how to add a zipper to the bag.

Following this, I went to the closest department store, and found this:


Bernat English Rose wool yarn for felting. And I literally fell in love with this colour scheme. Although the gauge is different, I decided to buy it anyways, and bought the remaining 4 balls of yarn, hoping that it's enough for my project. They recommend a 6.5 size hook, which I think I'll follow, since in the original pattern, they recommend a size 8 hook for size 8 yarn. That means my squares will be a lot smaller, but I'll just make more.

I also made a small square when I got home, and briefly hand-felted it in hot water to see the effects, and the results were promising. As this project is wholly for me, I'll be updating as my project progresses.

My only worry is that b/c the yarn is a mix of colours, the granny square scheme won't show very well.

Tuesday, December 1, 2009

Shake N Bake alternatives

To be honest, I can be quite a lazy cook when it comes to dinner. Partly it's because no matter how much time I spend on dinner, my husband devours it all, provided that it's completely cooked. Of course, one might think "I bet he won't eat food that tastes terrible", but during my first pregnancy, I could not tolerate the smell of meat, and thus Ken had to eat boiled chicken breast, or boiled pork chop (no seasonings whatsoever) for 9 months. And he did with no complaints!

Oh wow, I really went off topic there, didn't I?

Anyways, being a lazy cook, I rely on shake n bake a lot. Why not? Just throw the meat into a bag, place it on a pan and bake away! The other day, I wanted to make chicken nuggets for Cassie, chicken nuggets being quite high on her favourite food list. Of course, when I need my shake n bake packets, that is the time I run out.

In a panic, I googled alternatives to shake n bake, and came across bread crumbs. Did I have bread crumbs? Of course not. However, I always use cracker crumbs to replace bread crumbs, and there are always crackers around the house, as my two little critics live on crackers.

So, with a rolling pin and plastic bag, I crushed half a package of whole wheat crackers into crumbs, added a bit of salt, pepper, and basil. For proper coating, I should have dipped each chicken piece into a bowl with a beaten egg, then dip into my cracker mixture, but being the lazy person I am, I mixed my egg with my meat, and then dipped into my cracker mixture.

The result? No picture, because the girls ate them up. Ken honestly couldn't tell the difference in terms of taste, but I felt better because I felt the batter coating was much healthier.

So the next time you run out of shake n bake, try using bread crumbs, cracker crumbs, or even cereal crumbs!

Pizza

When I got my new Kitchenaid mixer, it came with a few recipes, including an easy pizza crust. Both my girls and Ken love eating pizza, so I thought I would give it a try.

My goal was to make 4 mini-pizzas from the pizza dough.

I have made pizza before, and the middle always ended up too soggy, so I decided to make smaller pizzas, as well as pan-frying my toppings prior to addition to the pizza. I made a ham and pineapple pizza, as well as a chicken and red pepper pizza. I pan-fried both sets of toppings until pretty much cooked through.

I used a fast rise yeast, which allowed me to omit the first rise.

I followed the recipe exactly, and I must admit that the kneading done by my KA mixer made life much easier. It was very satisfying to see all the dough clinging to the dough hook. After the dough rising, I divided up the dough, rolled it out, pulled it a bit, and then added the tomato sauce, grated cheese, and toppings.

It only took 15 minutes for me to bake two mini-pizzas in my tabletop convection oven. Overall, it took me 2 hours from start to finish to make the pizzas.

I will definitely make these again. My little critics devoured their portions, and all four pizzas were consumed almost the moment they came out of the oven. The dough was soft and chewy, and extremely yummy.


One thing though, a handful of cornmeal was scattered across the pan before the pizzas were laid on top. What's the purpose of this? I must google.

No crocheting?

I have been posting mostly cooking posts mainly because my current crochet projects are for Christmas gifts. Hence, no posting about them until they have been completed and opened by their receivee. Sorry!

Wednesday, November 25, 2009

Cake balls

Another one of my favourite sites is Bakerella. I'm not good with decorating, so I just love going through that site and looking at the pretty colours and yummy baked goods. After some thought, I finally decided to try making cake balls, as it seemed pretty easy.

I didn't make cake from scratch, and just used cake mix.

Step 1. Bake the cake.


Step 2. Let the cakes cool and then crumble into a bowl. I did one cake at a time, and added half a can of whipped frosting to each.

Step 3. Mix throughly. Form small balls from the mixture.


Step 4. Freeze for 15 minutes.

Step 5. Decorate. I chose to dip them in chocolate, but I had a lot of trouble doing so. I ended up finishing, but the chocolate remained a bit sticky. I also decorated them with some sprinkles.


I gave Cassie one to try, and she really liked it. Ken thought it was raw, so I assume he didn't like it. He did take half of the batch to work, and all his co-workers loved them, so I guess they are quite good. I think I'll stick to cookies though. Cake just isn't my thing.

Wintermelon pastries (aka. wife cake or lao por bing)

I always like eating lao por bing, and when one of my favourite blogs posted up a recipe, I couldn't wait to try it. The recipe is posted there, so I won't bother repeating it.

Of course, such an endeavour (it is a complicated recipe!) wasn't without complications. Looking for candied wintermelon took quite awhile, simply because I had to travel further in town to get some. I eventually found some for a low price at a Chinese herbal shop.

Issue #2 was trying to figure out the conversions as I didn't have a kitchen scale. I ended up using three different websites in order to convert everything (you can visit them here: one, two, and three).

Onwards and forwards.

The water and oil doughs were more difficult to make than I expected. Seriously, how hard can mixing flour and oil be? The problem was that more oil was needed to make the oil dough, and less water was needed to make the water dough. I had to make the water dough twice because the first time, I just dumped the water into my mixer. I would recommend for each dough, to mix all the dry ingredients first, and slowly add oil or water as needed to make a nice dough.

I also made the doughs the day before and let them rest in the fridge overnight. It made the dough nice and easy to work with. I also couldn't figure out which dough was on the outside and which was in the inside, but the textures of the dough solved that for me. The oil dough was crumbly, and impossible to roll out, while the water dough was soft and elastic-y. So, the oil dough went inside the water dough.


Since I didn't have a kitchen scale, there was no way I could divide the dough into 10 g portions, so I just eyeballed it. I ended up dividing each dough into 11 portions, but I think 10 portions would be better for future reference.

The wintermelon mixture was a big headache as well. Again, there seemed to be too much water in the recipe, and I couldn't figure out what "boiled drinking water" meant. Is it boiling water, or cooled boiled water? I ended up using boiling water. I first creamed the sugar with the margarine, added all the other ingredients, and slowly added boiling water until I had a thick mixture. I wasn't sure how to "knead" this mixture, so I just mixed it well. It got thicker as it sat, so maybe I was supposed to use the full amount of water.


The assembly of the pastries was pretty fun until I got to adding the wintermelon mixture. I couldn't make it work properly, and if anyone has any tips on how to wrap a thick liquid mixture in a pastry, please let me know! I just sealed it the best I could, and hoped for the best.


The egg wash is absolutely essential, and gave a nice colour to the final result.


After baking, I was relieved to find only one casualty, the rest didn't leak. After letting it cool a bit, I shared one with my little critics. The pastry was definitely flaky, but not much flavour. It didn't seem as flaky as the pastries I buy in bakeries, but I think it's probably because of the fat content in the doughs. The wintermelon mixture was the right sweetness, and blended well with the pastry. I probably should have flattened the pastries more prior to baking, to have a more typical spherical shape.

My little critics enjoyed the pastry, and asked for a second after they polished off the first one.

I wouldn't say that this recipe was a complete success, but the results were quite decent. I might make them again, considering I still have half a bag of candied wintermelon.

Monday, November 23, 2009

Chocolate meringue cookies

With the purchase of a new kitchenaid mixer, I was excited to make something that involved its use. Hence, I chose to make chocolate meringue cookies because whipping egg whites was not something I could do in the absence of the mixer. Believe me, I tried!

I'll post the end product at the end of this post. You'll understand why when you see it.

I browsed one of my favourite recipe sites, allrecipes, for a nice meringue cookie recipe.

Here is the following recipe. It had a nice high rating, and it seemed rather easy.

Chocolate meringue cookies

Ingredients:
3 egg whites
1/8 tsp cream of tartar (to stabilize the egg whites)
1/2 tsp vanilla extract
2.3 cup white sugar
1 tbs cocoa powder, unsweetened
1/3 cup semisweet chocolate chips

Method:
1. Preheat oven to 300 degrees F.
2. Combine egg whites, cream of tartar and vanilla and beat until egg whites form soft peaks. Slowly add sugar, and beat until stiff peaks form.
3. Fold in cocoa powder and chocolate chips
4. Drop mixture in teaspoonfuls onto a cookie sheet and bake for 25-30 minutes.

Changes that I made:
1. I forgot to add the chocolate chips.
2. I piped the meringue instead of spooning it onto a cookie sheet
3. I didn't have parchment paper, so I used foil instead, greasing it with a bit of oil.

Everything was looking good as I prepared the cookie mixture:


However, the end result was this poo-like blobs on a cookie sheet.


I'll have to admit that my piping techniques are minimal. You can see that I tried piping it in different ways, but they all look like poo. Ken came home from work and exclaimed "Why are you baking mini-craps*?" My little critics regarded them suspiciously. Taste-wise though, they were light and fluffy with a bit of chocolate taste. They didn't melt in my mouth though.

So in the end, I doubt I'll make these again. It was fun making them though. Perhaps next time I'll skip the cocoa powder and make a meringue pie. Now I have to figure out what to do with 3 dozen little poo's.


*Obviously, Ken didn't say "crap", but said "sh**", but let's keep this blog clean, shall we?

Wintermelon soup

Wintermelon soup has always been one of my favourite soups. It's also Cassie's favourite soup, and it's quite simple to make. My mom and my MIL makes two different versions, but I'll be describing my mom's version today.


Wintermelon soup is supposed to be best for the summer weather because it doesn't take long to cook, and wintermelon has a "cooling" effect according to my mom.

Ingredients:

1. Wintermelon, chopped into 2 cm cubes. In the supermarket, it usually comes in slices, as a whole wintermelon is quite large. Try to find a middle section, rather than an end section. At home, rinse the melon, carve out the seeds, and cut off the skin. Then chop up the melon into cubes.

2. Pork. I used some ground pork, but you can also use pork bones, chicken, ham, seafood (shrimp, scallops, crab, etc). If you do you pork bones, boil them briefly and discard the water to boil out the excess fat.

3. Chinese mushrooms. I soaked them in warm water for 2 hours, and then sliced them into small pieces. The water used in the soak can also be used in the soup, provided that the mushrooms are cleaned prior to soaking.

Method:

To prepare the soup, I boiled the chinese mushrooms and meat in a pot. I also added a bit of salt to taste, and 1/2 tsp of sugar. My mom tells me that when cooking with chinese mushrooms, one must always add a bit of white sugar as this will bring out the flavour of the mushrooms more.

Once boiling, I add the wintermelon cubes and allow to boil on medium high until the wintermelon becomes more translucent. On my stove, it took me about an hour from start to finish, not including the time to slice and dice the ingredients.

For extra flavour and for presentation purposes, one can add a beaten egg to the soup to make what my mom calls "egg flower".

My critics enjoyed the soup.

Enjoy

Chinese Wontons

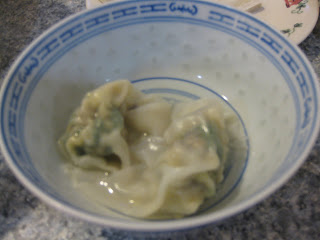
For dinner today, I made wontons. My MIL makes the best wontons I've ever eaten, so I made sure that I got her method.


Ingredients:

1. Ground pork, about one pound. It's less healthy to eat pork fat, but a bit of fat makes the wontons taste much better. My MIL buys lean ground pork and ground pork and mixes it together. Today, I just used lean ground pork. Alternatively, you can use chicken or turkey. One can also add chopped up shrimp, but I didn't use any because my youngest daughter would be eating the wontons. Season with salt, white pepper, and sugar (1/2 tsp). One can add other seasonings such as hoisin sauce, but I kept mine more bland for my daughters.

2. Bok choy. Finely chopped. After chopping, place it in a strainer over a bowl, and add some salt. Allow to sit for 2-3 hours. This step drains the water in the vegetable. I bought some baby bok choy for today's wontons.


3. Black fungus, chopped. According to wikipedia, the scientific name is Auricularia polytricha. It adds a crunchy texture to the wontons. Alternatively, one can add corn instead.

4. One egg, beaten up. This is more flexible, but the egg is there to keep the meat in the wonton wrapper. I had leftover yolks from another recipe that I was using, so I used that instead.

5. Wonton wrappers.

Method:
1. Mix the ground pork, bok choy, black fungus, and egg.

2. Take one wonton wrapper. One side is heavily floured. This floured side should be the outside of the wonton. Scoop a generous teaspoon of the meat mixture, and place it in the middle of the non-floured side. Fold the wrapper diagonally in half and then bring the other two corners together to form a ball.


I always think it's better to have leftover meat rather than leftover wrappers. The leftover meat can be steamed for a nice side dish with rice. Unfortunately, I had leftover wrappers, which I wrapped tightly in plastic and placed in the freezer for next time.

Once all the wontons are prepared, I placed them in salted boiling water, one at a time and in batches. After placing them in boiling water, I stirred them briefly and then allowed them to cook. They are done once they are floating and the water is boiling again. This water is discarded and the wontons can be served in clear chicken broth.

Typically, I make more than I can eat at one time, and there are two ways for storage:
1. Uncooked, in the fridge (2-3 days) on in the freezer (2-3 months). Cook as needed.
2. Boiled until almost completely cooked, rinsed in cold water, and in the fridge. Reheat in chicken broth.

My critics enjoyed the wontons. Cassie (3.5 years) asked for a second bowl of wontons, and Adrie (1.5 years) polished off her bowl in an instant. My husband thought he was eating his mom's wontons, so I guess I did something right!

Enjoy!

A new blog

After much thought, I have finally decided to start a new blog. Unlike my other blog, this one will be about my two favourite hobbies: baking and crocheting. At the moment, I have a few general ideas about what I will be blogging about:

Baking/cooking: I am not a gourmet chef, butI really enjoy baking, so I intend to review recipes that I find online, along with any changes I made, and the end result. As for cooking, I wanted to record the bits of wisdom that I have picked up from my MIL and my mom, especially in terms of Chinese cooking. You will find that I rate things usually according to how much my daughters (ages 1 and 3.5) enjoy the food.

Crocheting: There are tons of crocheting tutorials, patterns, etc. online, so I will be mostly talking about more in-depth details about crocheting, and testing out patterns. I hope to also post up pictures of my current/finished projects. If I ever find a nice pattern online, I might mention it. Rarely, I try to develop my own pattern, and if that happens, I will probably post it online.

You'll also find that I will also post up failures along with successes. Sometimes when things don't work out, it's best to just laugh a bit and learn from our mistakes.

So there we go. My first blog should be about cooking: Wontons, wintermelon soup, and for dessert, chocolate meringue cookies.